Before you begin to write programs with Python, it must be available and correctly configured on your computer. This post will guide you in installing and creating your first Python program using the simple and attractive IDE interface and print function using real-life examples.
Next, let’s begin with the following simple seven steps.
The Process of downloading and installing Python from a credible source.

Downloading and installing the current Python software on your Windows OS computer securely is very easy. To do that job in a moment, follow the simple steps below.
Step 1: Search for software setup using your browser
Open any of your favorite browsers (Google Chrome, Microsoft Edge, Operamini, Apple Safari, and Brave) and search “Python download for Windows.” You will receive the search results shown in the screenshot below.
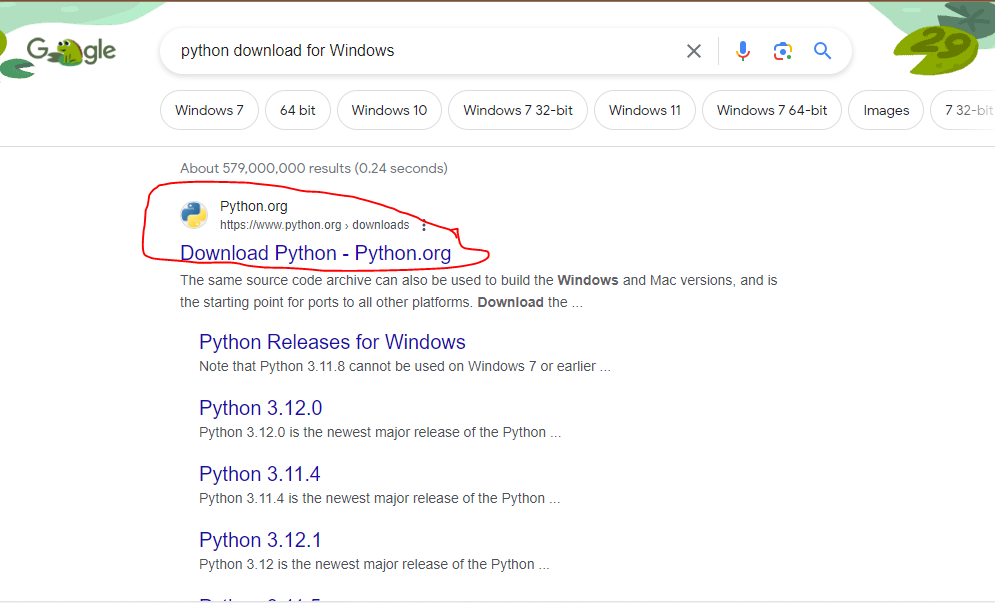
Click the first link for the Python Organization downloads, which will take you to the next web page in step 2 below. Alternatively, click this link: https://www.python.org/downloads/ to go directly to Python’s official downloads page.
Step 2: Downloading the Python setup
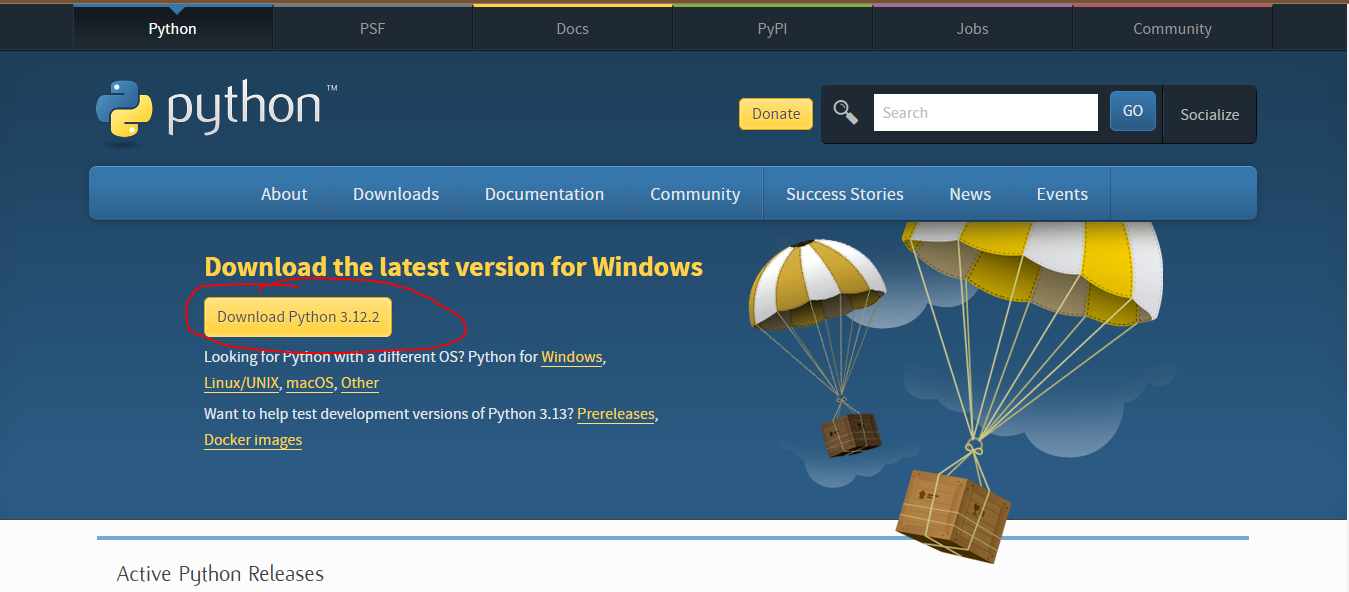
Once the next page opens after step 1 above, click the “Download Python” button below the topic “Download the latest version for Windows” circled on the screenshot below.
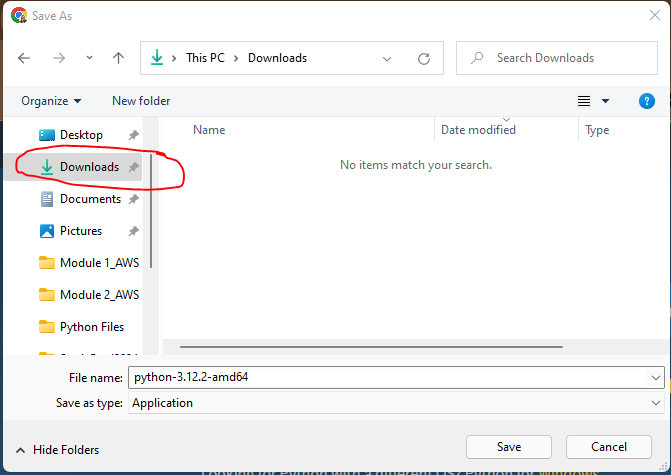
You will be asked to save the setup file. Please choose the location on your computer where you want to keep it. For example, I stored the Python file in the Downloads folder for this guide, as shown in the screenshot below.
After that, it should start downloading, and indicate it on your browser’s download progress icon.
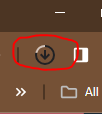
Stay cool as you wait for the setup to download. It should be noted that the download time depends on your internet speed. Therefore, if your internet speeds are high, you will wait for a short while and vice versa.
Step 3: Open the Python setup to install
Next, after the setup finishes downloading, it is time for us to install. Therefore, to install it on your PC, please visit and open the location where you downloaded and stored the setup file. Once you are in it, double-click the setup icon to start the installation process. As a result, the Python setup installation panel opens as shown below.
If you look at position 1 on the screenshot, the version to be installed is 3.12.2, which is 64-bit. In addition, below the version topic is an installation statement guiding us on what we should choose next.
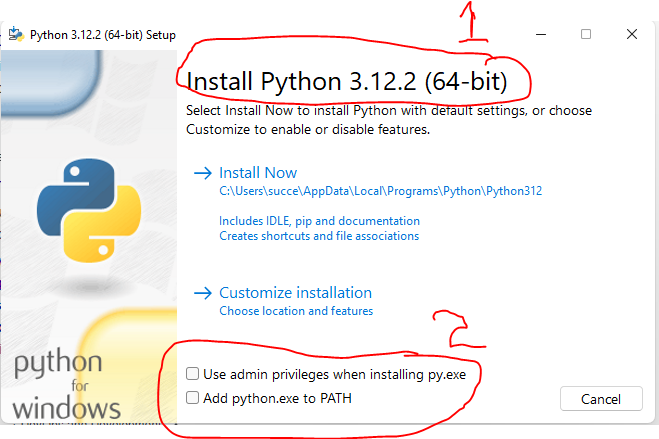
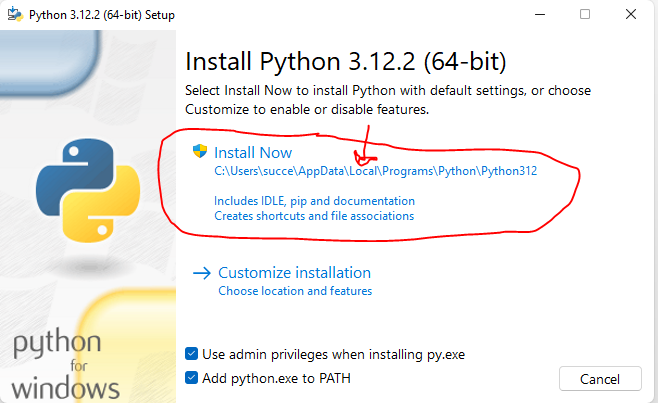
Make sure you select the two check boxes circled and labeled 2 in red color on the screenshot above (number 2). After ticking by clicking on them, they are highlighted with a tiny tick in the middle and blue. Thus, they should look like in the image below.

The two options ensure you will not experience challenges using the Python environments after installation.
Step 4: Starting the installation process
Next, click the first option on the install menu – “Install Now” option.
Step 5: Managing the Microsoft User Account Control settings
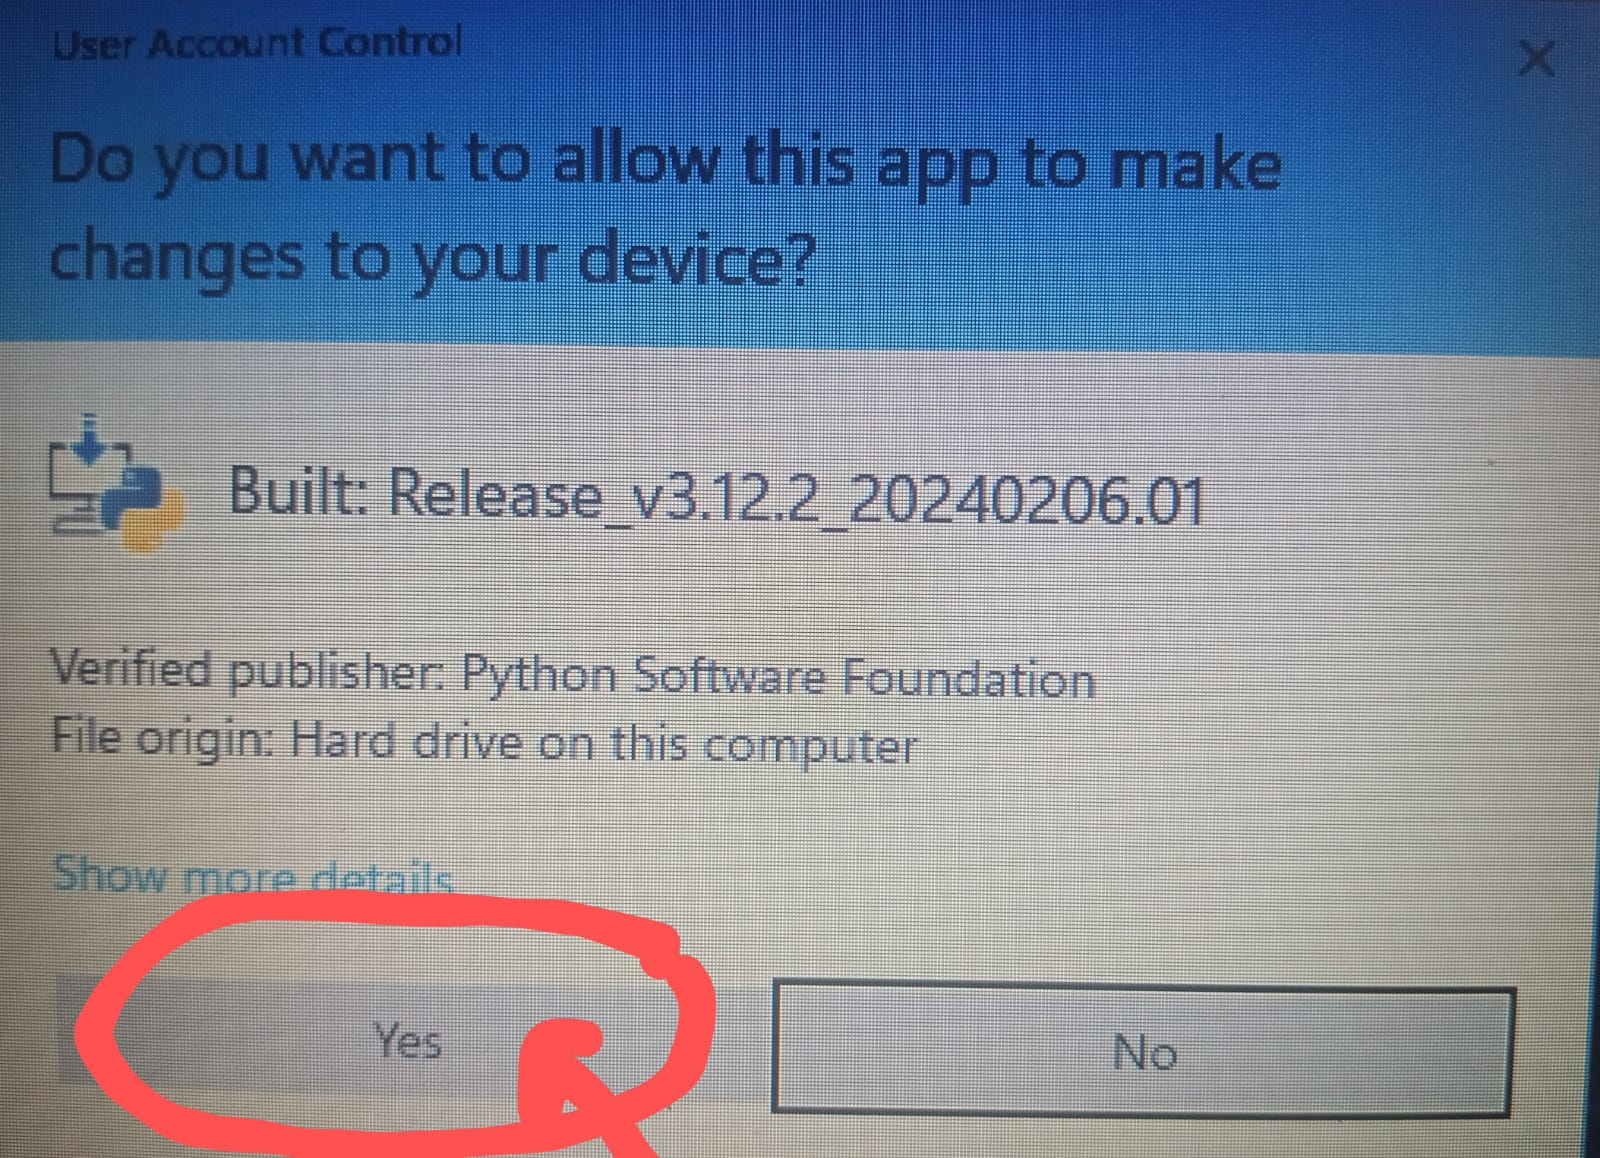
Next, if you are using the Microsoft User Account Control settings, you’ll be prompted to allow changes on your hard drive. Therefore, once it appears, do the following.
On the “User Account Control” prompt menu on your screen asking “if you want to allow the app to make changes to your device”, click the “Yes” button.
Immediately, the installation process starts.
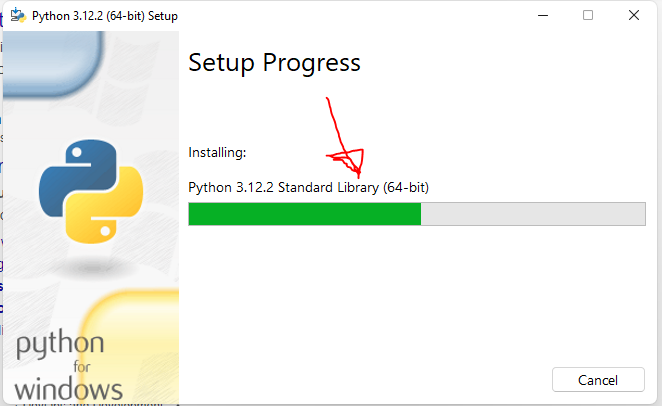
Wait until the setup completes the installation.
Step 6: Finishing the Python setup installation successfully
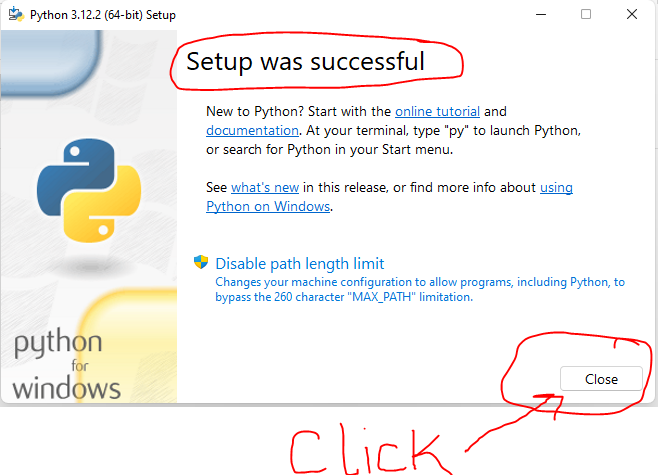
After that, the installation progress changes to “setup was successful” at the top, and a “Close”button is activated on the lower right side of the window. Click the close button to finish up the installation.
Step 7: Verifying if the setup was correctly installed
After closing the installation wizard, the next activity is to confirm if the setup was installed successfully. For you to quickly verify, use the Windows 10/11 command line terminal known as cmd.
Are you wondering how to access the cmd terminal? If yes, stop wondering because I figured out the answer to your question beforehand. Therefore, follow the following method to access it for verification.
First, open the cmd interface by going to the search button (on your taskbar).
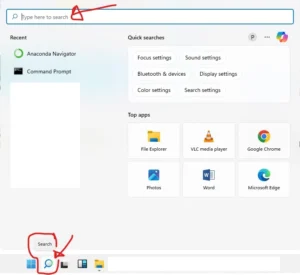
Secondly, type “cmd” on the search bar (position 1), and the best march will appear on the list below the search bar.

Then, choose either the first option (Number 2) or option 2 on the right side of the menu (number 3). After selecting one of the options on the search results, the command line interface opens in a moment.
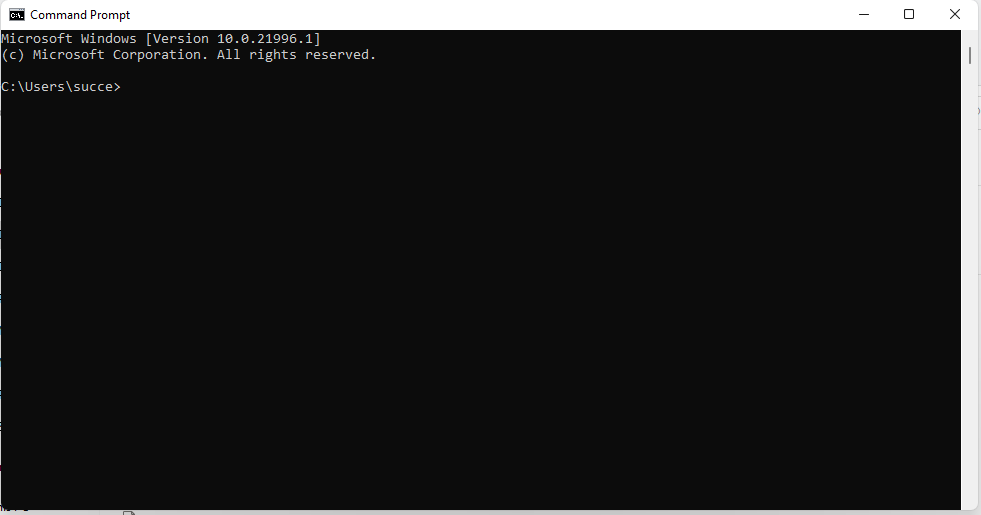
Thirdly, once it opens, type the command “python—version” and press “Enter” on the keyboard to display the current version of Python that has been installed. The results of executing the command are as follows.

Hurray! You have Python 3.12.2 installed on your Windows operating system machine and are ready to use it.
Note: When I first wrote this guide, the latest version was Python 3.12.2. So, the version might be updated and new when you come across this guide. However, don’t worry or be scared because the guide installs the latest version of Python. Therefore, I promise you a seamless installation journey.
Now, let’s access and use the Python IDE to write a program for the first time.
Writing your first Python program code – “Hello World” with Python IDLE
By default, after installing Python, you have the IDLE installed. This is because the Integrated Development and Learning Environment (IDLE) is the primary IDE for the Python programming language. Generally, the acronym name IDE stands for Integrated Development Environment.
So, how do you launch and use Python’s IDE to write your first program? Let me tell you something you may not know. The process is very simple and very effective. Are you excited to start writing Python programs? I’m pretty sure you are; therefore, let’s dive in.
How do you open the IDLE and start writing program codes?
I know you are eager to write your very first program, right? I know the feeling, too, because I’ve been through the same situation in many situations. Thus, trust me, I know waiting for something new, especially one you are excited about, is not easy.
However, before we begin, let me tell you one important thing about the Integrated Development and Learning Environment. This will ensure you are the best at using the Python IDLE coding environment. Also, the tip will help you to be in a position to handle any size or complexity of your codes as projects grow bigger.
Pro Tip
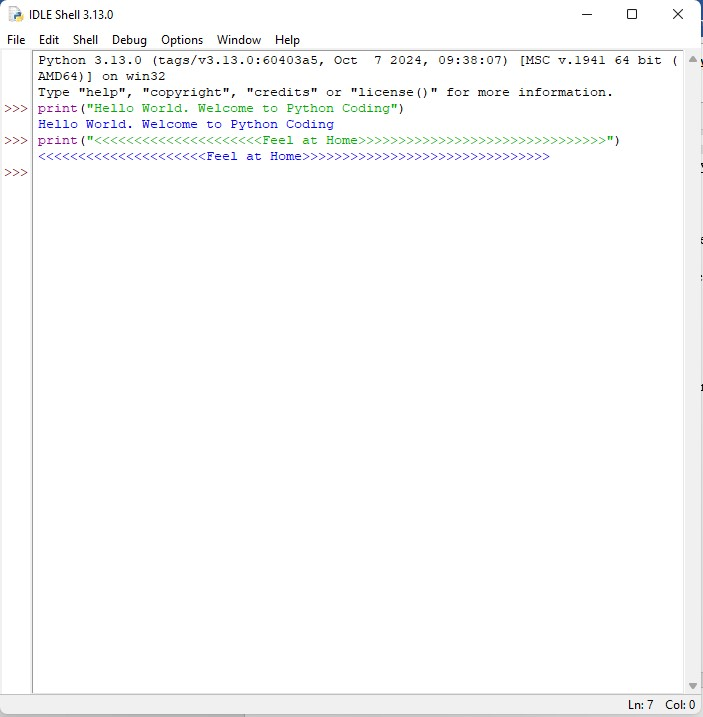
If your code is small, when the Python Shell window opens, write them directly and test them on the same window. As a result, the process will be simple, and the output will be just below a few lines of code. For example, see the code lines and outputs in the same window below.
However, if you want to have a long piece of code, open a new file by going to “File” on the top left and creating a new file from the menu. The new window opens with an advanced menu, enabling you to type and run a long code directly. Having said that, let us move on to even more interesting stuff.
Are you ready to start writing your first Python Programming Language program? I know you are, but before that, let’s look at how to launch the Python IDLE on our Windows computers.
2 Ways to access and open the Python IDLE interactive shell
Generally, two main ways to open the Python coding shell are through the Windows start menu and the search button on the taskbar by typing in the search bar.
A. Opening the IDLE shell using the Windows search button
i. Click the search button next to the Windows icon.

ii. Next, type IDLE in the search bar (position 1 on the screenshot below).
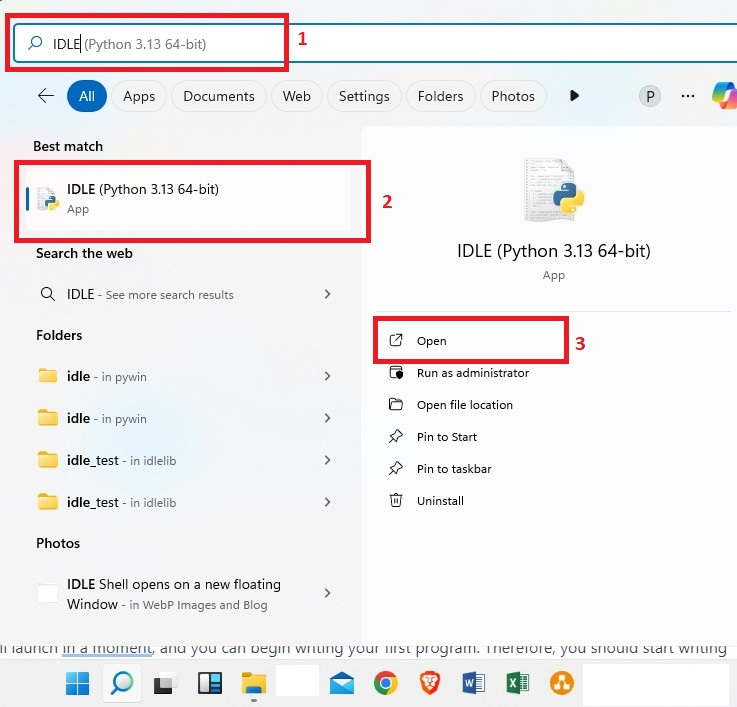
iii. Then, on the search results, click either the best match result containing the name (Position 2). Or the open button on the right side of the menu (Position 3).
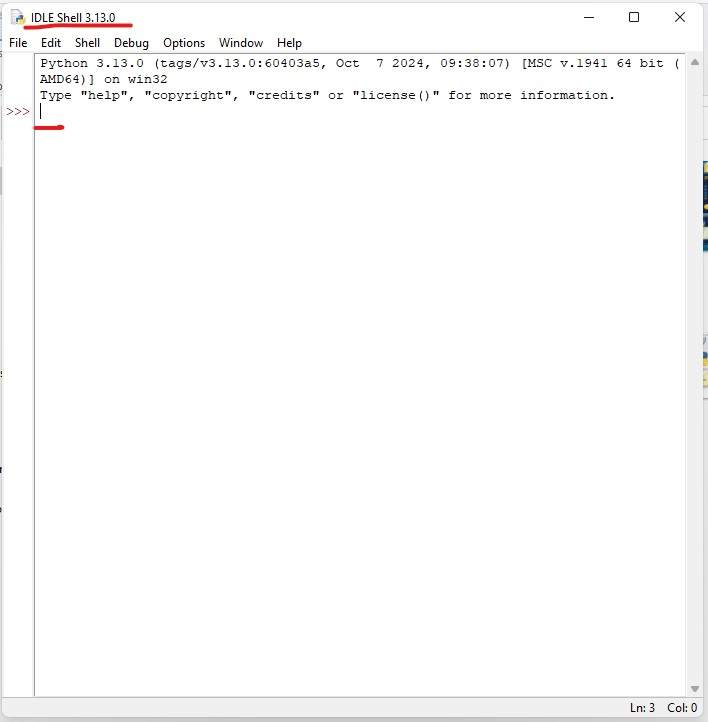
iv. After clicking, the IDLE will launch in a moment, and you can begin writing your first program. Therefore, you should start writing on the first line where the cursor is blinking.
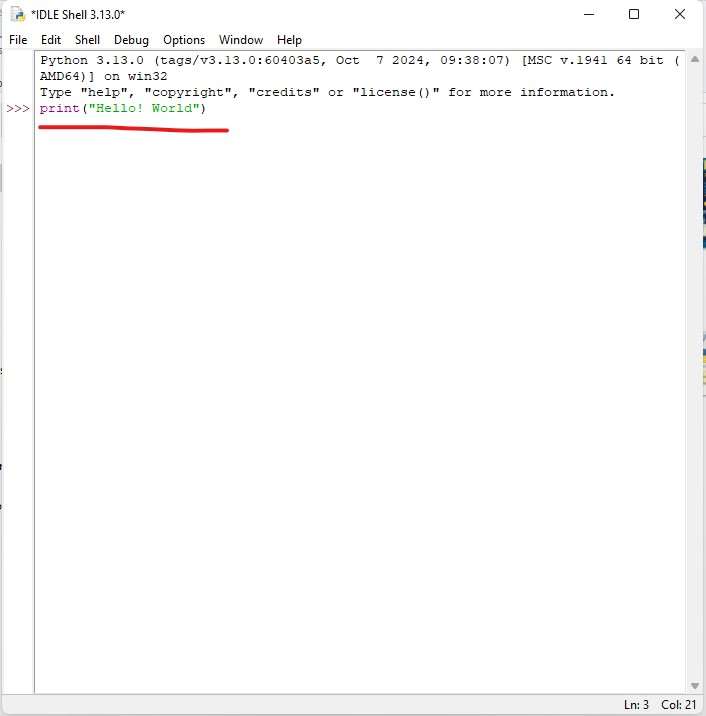
v. Finally, when you finish typing the program, press “Enter” to execute it. For example, I typed the program code line “print(“Hello! World”)” in the first line.
After that, I pressed the enter button on my keyboard, and the following output was displayed on the next line.

Note: The interactive shell only executes small code pieces and displays the results below the code lines.
B. Opening the Python IDLE shell using the Windows start menu
On your desktop, go to the Windows start menu and click on it to open the start menu.
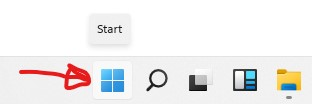
Next, on the new start menu, click on the all apps extension button to open the main menu, which is arranged in alphabetic order.
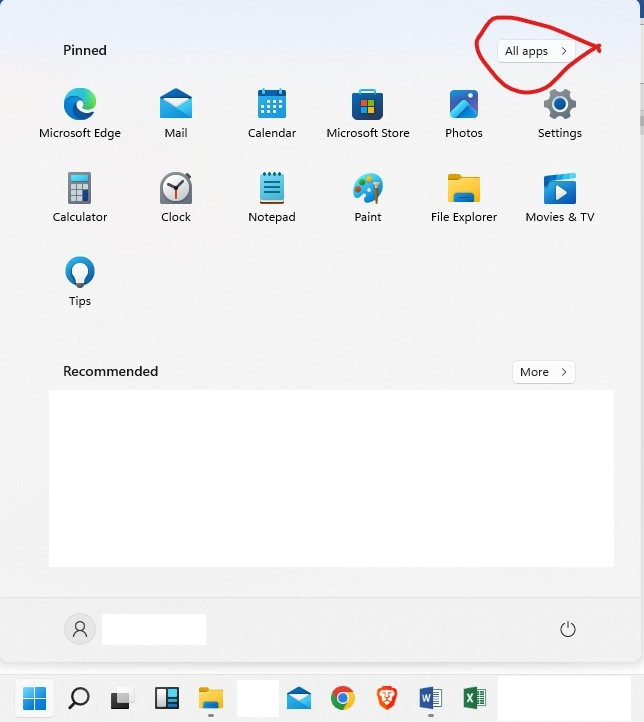
Next, scroll up the menu until you find the newly installed Python application under the menu items starting with the letter “P.”
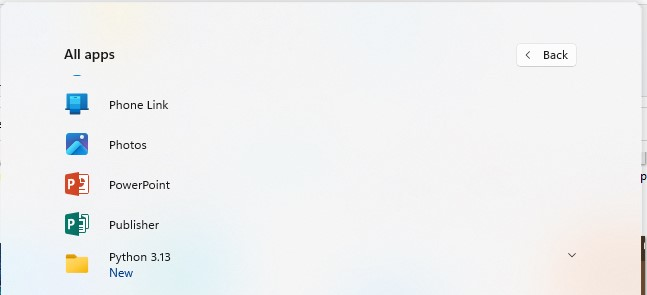
After that, click it or the extension on the right side to open all the applications under the Python folder menu.

Then, click the first item on the menu—IDLE (Python 3.13 64-it). The IDLE Shell will open in a new window.
Now that you know how to access and launch the IDLE shell, let us open it, write, and execute a long code.
How to create and execute long code pieces using the IDLE shell
Earlier in our guide, I mentioned that you can write and execute small pieces of code directly after opening the interactive shell. What if you want to write a long piece of code or write small ones in a more advanced environment? Here is how to achieve it in simple terms.
First, access using any of the methods discussed and open it. Then click on the “File” menu on the top left of the new shell window. On the floating menu, select the “New File” option.
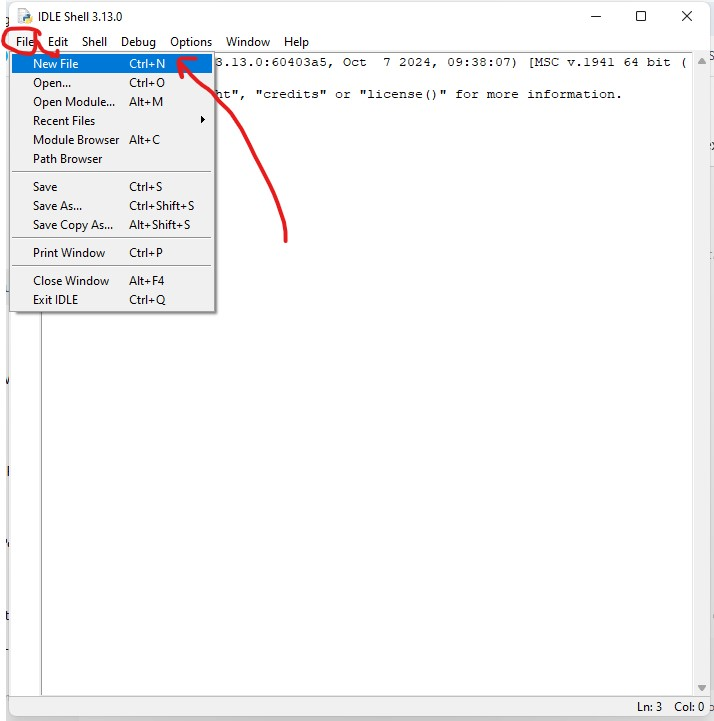
Secondly, when the new file opens, start typing your code.
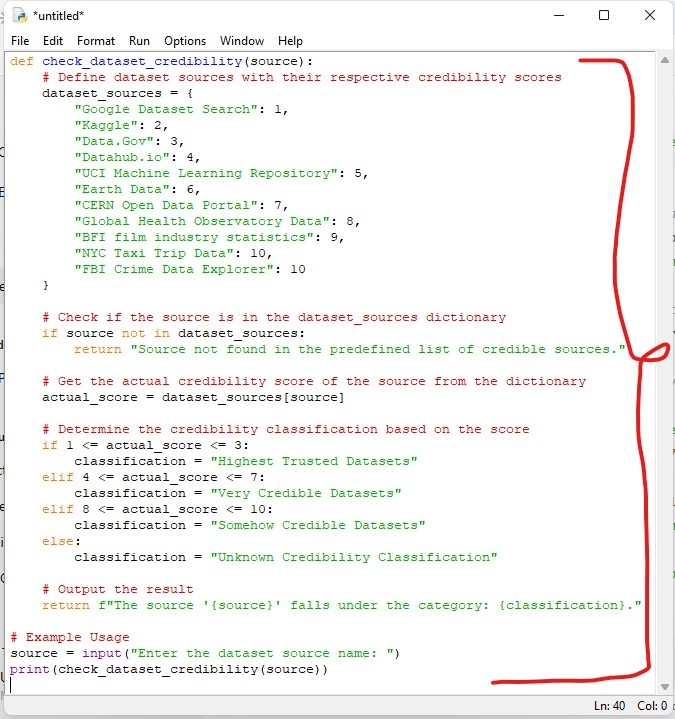
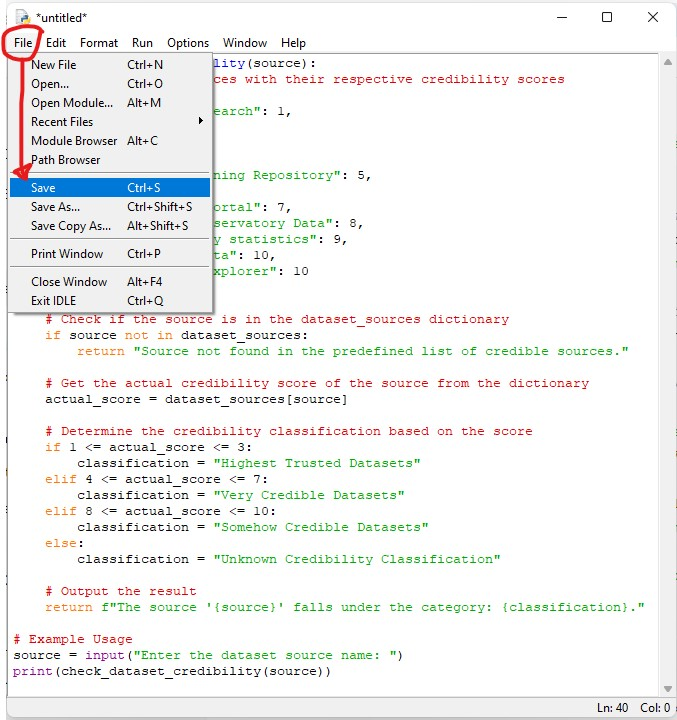
Finally, after creating your code, save the file as follows before executing it: On the top menu, click File and choose Save on the dropdown menu. The program will not work if you execute the file before saving it.
Next, choose where to save the program file on your Windows computer. In this case, I saved the file on the desktop.

Also, remember to save the file using the Python file extension (.py). This enables your computer to detect and execute the program when you run the program in the shell.
Note: Once you get used to shell programming, you can use the shortcuts displayed on each menu. For example, you only need to press the “Ctrl + S” combination to save the program.
Once the file is saved, head to the top menu and click Run. Then, choose the first option, “Run Module,” which appears on the drop menu.
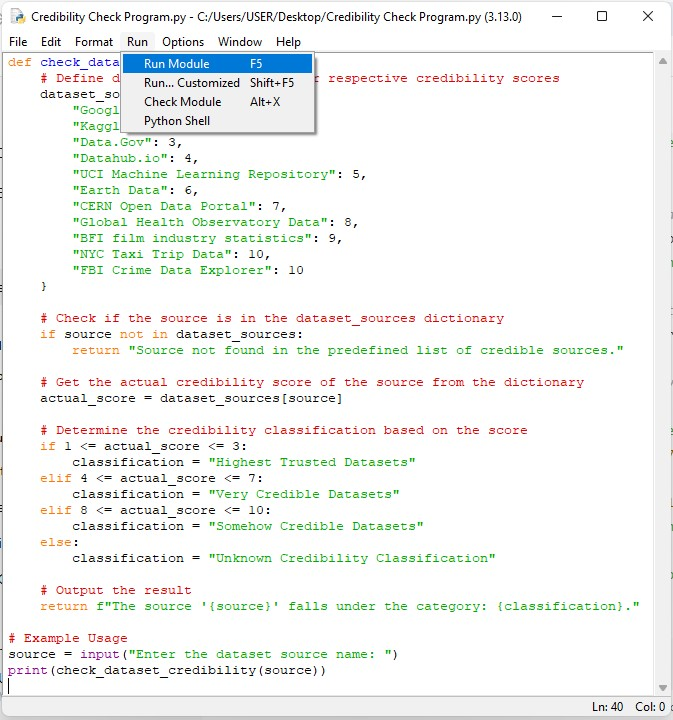
Alternatively, you can press the F5 key on the keyboard to run the program directly.
Summing up everything!
The guide has taught you everything important about downloading and using Python. First, it has taught you that by following this guide step by step, you are guaranteed to install a legit copy of the programming language on your Windows 10 or 11 computer. The procedures followed are simple – including searching for the setup online, downloading, accessing, and installing.
Therefore, you can follow this guide with or on your favorite browser to download and install the tool successfully. Secondly, you’re also guided on accessing the IDLE coding shell and writing your first code. You can either access it through;
- the Windows start menu by opening the “All apps” extension menu and scrolling up until you see the Python menu.
- by using the Search button next to the start menu above, type the shell name IDLE and select it from the search results.
Furthermore, through the guide, we’ve seen how to verify if the installation was successful and the version of Python. Additionally, we have also learned how to write both short and long code pieces using the IDLE shell. In conclusion, with this guide, you’ve just kickstarted your Python programming journey with us. More tutorials, guides, and courses are coming up in the near future. Stay tuned for more learning content and guides.

